

Salt and Vinegar Kale Chips are a deliciously healthy way to eat your greens; make them in a toaster oven when it’s too hot to use the oven.
PIN Roasted Kale Chips to try them later!
Countless other food bloggers have asked “Why did it take me so long to make kale chips?” so I’ll spare you that and just say that now that I’ve finally made roasted kale chips myself, I see what the fuss is about. Not only are they full of nutritious goodness, but these Salt and Vinegar Kale Chips are delicious. If you don’t believe roasted crispy kale leaves can be that special, I challenge you to try them and see what you think.
When I finally decided to try making kale chips, I found there were endless variations on the recipe, so I tested 6 slightly different versions before I came up with the recipe I liked best, where the kale chips are roasted for a longer time at a fairly low temperature. I wanted to make salt and vinegar chips, and I found I liked the kale best when the salt was added after roasting. I don’t know if adding the vinegar made the kale chips turn more brown, but I didn’t care how photogenic they were because I loved the taste.
What are Kale Chips?
Kale chips are pieces of fresh kale that have been roasted until they are dried and crispy. They’re really quite delicious for everyone who enjoys the flavor of kale.
What ingredients do you need for this recipe?
- kale leaves
- extra-virgin olive oil
- vinegar (see notes)
- sea salt to taste
How to make Salt and Vinegar Kale Chips:
(Scroll down for complete recipe with nutritional information.)
- Start with a lovely bunch of curly kale. This was about six ounces, and since I was roasting it in my toaster oven (before the new stove arrived) that was just the right amount to fit on a small cookie sheet.
- Cut away the inner ribs and discard, and then tear the kale leaves into same-size pieces. (I made my pieces about the size of a small potato chip.)
- Here’s how many pieces I got from the 6 oz. bunch of kale in the top photo.
- I washed my kale in a salad spinner, and then spun it dry over and over, until the leaves were dry. If you don’t have a salad spinner, I’d use paper towels to dry the leaves.
- I used olive oil, Spanish sherry vinegar, and sea salt to flavor the chips, but I think any type of salt and vinegar that you like the flavor of would be fine.
- I wanted to “massage” the kale leaves with olive oil to be sure they were well-coated, so I put the chips into a Ziploc bag, added half the olive oil, squished it around, added the rest of the oil, and then massaged some more.
- Then I sprinkled in the vinegar, closed the bag, and shook it until the drops of vinegar were well-distributed on the kale pieces.
- In all the directions, probably the most important thing is to arrange the kale pieces in a single layer on the pan so they aren’t crowded when they cook. Here are my kale pieces when they started out in the 300F/150C oven.
- Here are the chips after they roasted for 10 minutes.
- This next photo is how they looked after 20 minutes.
- They’re a little more crispy after 30 minutes.
- I let them cook five minutes more for a total of 35 minutes roasting time. Sprinkle with sea salt and eat immediately!
Ingredients
- one bunch of kale leaves, about 6 oz.
- 1 T extra-virgin olive oil
- 1 T vinegar (see notes)
- sea salt to taste
Instructions
- Preheat oven to 300F/150C.
- Cut away inner ribs from each kale leaf and discard, then tear the kale leaves into same-size pieces. (I made my pieces about the size of a small potato chip.)
- Wash torn kale pieces and spin dry in a salad spinner or dry with paper towels until they’re very dry.
- Put kale pieces into a large Ziploc bag (or use a bowl if you don’t mind getting your hands oily.)
- Add half of the 1 T of olive oil, seal bag, and squeeze the bag so the oil gets distributed evenly on the kale pieces.
- Add the other half tablespoon of oil and squeeze the bag more, until all kale pieces are evenly coated with oil and slightly “massaged.”
- Open the Ziploc bag and sprinkle the 1 T sherry vinegar over the kale leaves, then seal bag and shake to spread the vinegar out over all the leaves.
- Arrange kale leaves in a single layer on a baking sheet, then roast until they are mostly crisp, about 35 minutes.
- I checked every 10 minutes or so and turned some pieces over.
- I also found I didn’t mind if there were a few softer parts on some of the kale leaves, I liked the combination of crisp and softer parts.
- When chips are done to your liking, sprinkle with a generous amount of sea salt and eat immediately.
Notes
I used Spanish sherry vinegar, but any vinegar you like the flavor of will work
This recipe adapted by Kalyn with inspiration from many other bloggers who also made kale chips.
Nutrition Information:
Yield:
3
Serving Size:
1
Amount Per Serving:
Calories: 57Total Fat: 5gSaturated Fat: 1gTrans Fat: 0gUnsaturated Fat: 4gCholesterol: 0mgSodium: 207mgCarbohydrates: 3gFiber: 1gSugar: 1gProtein: 1g
Nutrition information is automatically calculated by the Recipe Plug-In I am using. I am not a nutritionist and cannot guarantee 100% accuracy, since many variables affect those calculations.
Did you make this recipe?
Did you make this recipe? Please leave a star rating (under the PRINT button in the recipe) or share a photo of your results on Instagram! THANKS!
Low-Carb Diet / Low-Glycemic Diet / South Beach Diet Suggestions:
Dark leafy greens have more nutrition per calorie than any other food source, and these roasted kale chips are a perfect snack for any phase of the original South Beach Diet or any type of low-glycemic or low-carb eating plan.
Find More Recipes Like This One:
Use the Recipes by Diet Type photo index pages to find more recipes suitable for a specific eating plan. You might also like to Follow Kalyn’s Kitchen on Pinterest to see all the good recipes I’m sharing there.
Historical Notes for this Recipe
These Roasted Kale Chips with Sea Salt and Vinegar were first posted in March 2010. The recipe was last updated with more information in 2021.
Share This:
We are a participant in the Amazon Services LLC Associates Program, an affiliate advertising program designed to provide a means for us to earn fees by linking to Amazon.com and affiliated sites. As an Amazon Associate, I earn from qualifying purchases.
Grandma Denny’s Homemade Ranch Dip
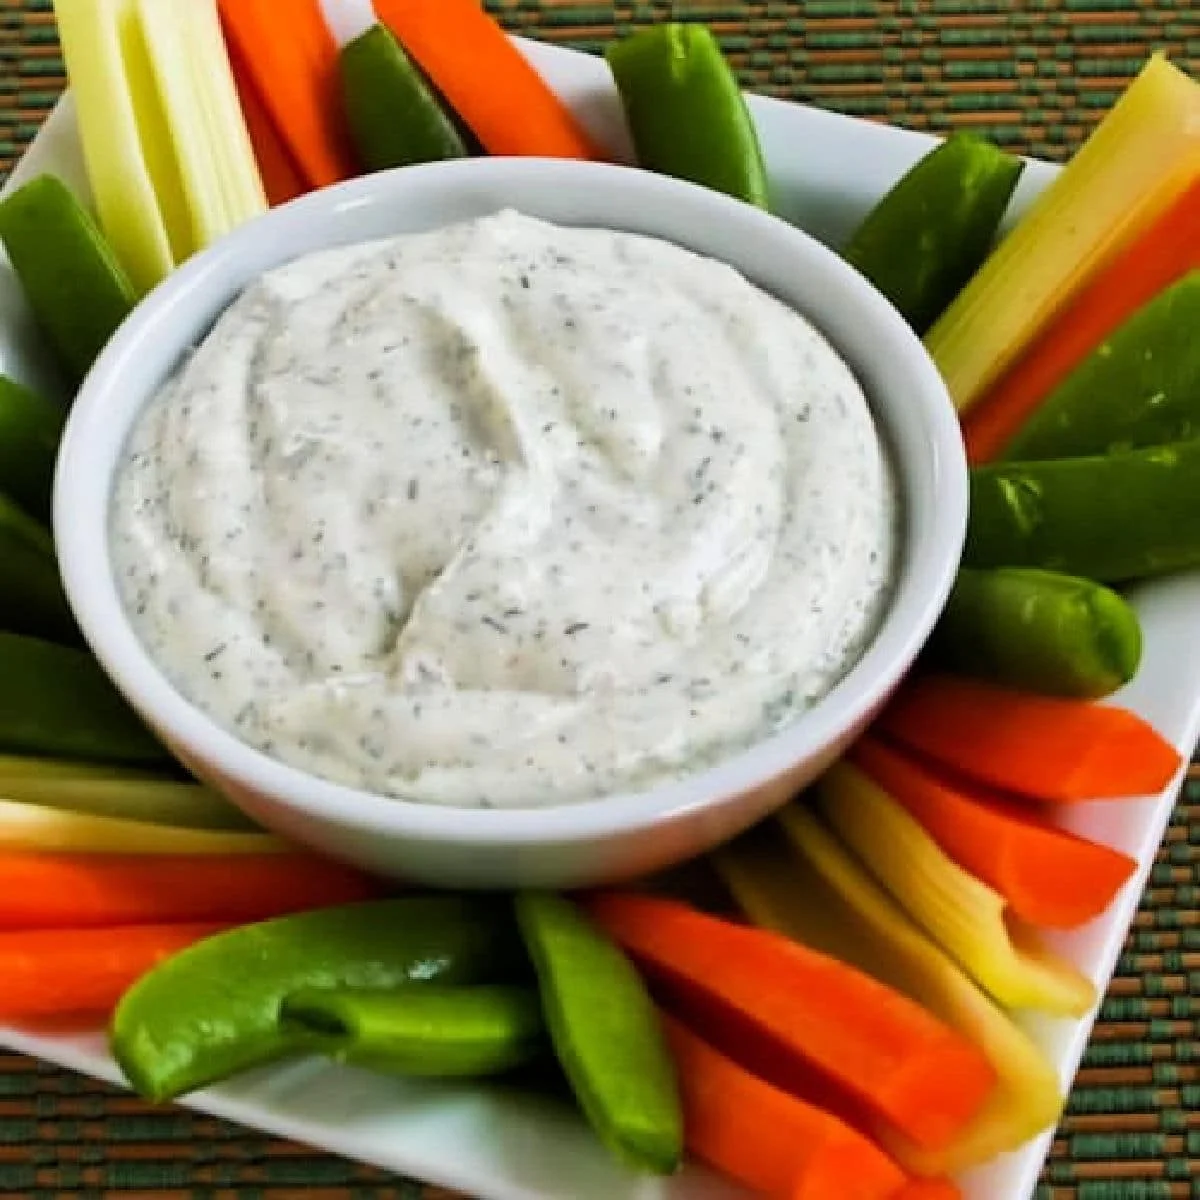
My Grandma Denny’s Homemade Ranch Dip was a Denny family favorite long before anyone heard of Ranch Dressing! And this family favorite Ranch Dip is a delicious low-carb and keto dip recipe and in my family this makes an appearance at every holiday gathering!
PIN Grandma Denny’s Homemade Ranch Dip to try it later!
My Grandma Denny’s Homemade Ranch Dip is one of my favorite memories from childhood! As early as I can remember, my Grandma Denny made a fantastic dip that she served with carrots and celery as an appetizer at every family gathering. In those days we called Grandma’s homemade ranch dip just *Vegetable Dip* as if there was only one kind of dip that could possibly be served with veggies.
This was long before the introduction of Ranch Dressing to the American culinary scene, and obviously my Grandma Denny was ahead of her time, because now people all over the country are eating Ranch Dip with veggies. And in my own extended family, there would never be a holiday gathering without this delicious homemade Ranch Dip on the table.
Of course there’s nothing wrong with making Ranch-Style Vegetable Dip using a package mix if that time-saver works for you. But my grandma’s Homemade Ranch Dip is a bit fresher tasting as well as being low in carbs, and if you usually use the mix but don’t have a package on hand I bet you’ll love my Grandma’s recipe.
Grandma Denny always used full-fat mayo and sour cream, but for anyone wanting lower fat you can obviously make this with reduced-fat products if you prefer. Or if you don’t like mayo, you might prefer the variation below for Greek Yogurt Ranch Dip, made with Greek yogurt and blended cottage cheese for a higher protein, lower-fat dip.
What ingredients do you need for this recipe?
(This is only a list of ingredients; please scroll down for complete printable recipe. Or if you use the JUMP TO RECIPE link at the top of the page, it will take you directly to the complete recipe.)
Can you make this dip with onion powder?
I love the flavor the grated onion gives to my Grandma Denny’s homemade ranch dip. But if you prefer or want to save time, just use 1 tsp. onion powder.
Can you make this homemade ranch dip with Greek Yogurt?
I sometimes make a variation of this that I call Greek Yogurt Ranch Dip that’s lower in fat and higher in protein. For that variation follow this recipe but replace the sour cream with one cup of cottage that’s blended in the food processor until it’s nearly smooth and replace the mayo with one cup fat-free Greek Yogurt. (This is the version I would make when I was strictly following the original South Beach Diet.)
Want a version of ranch dip with more texture?
You can make a variation of this homemade ranch dip recipe with a little chopped red onion, finely diced cucumber, and finely diced red pepper if you’d like a chunkier dip. I would use about 2 T of each.
How to Make Grandma Denny’s Homemade Ranch Dip:
(This is only a summary of the steps for the recipe; please scroll down for complete printable recipe. Or if you use the JUMP TO RECIPE link at the top of the page, it will take you directly to the complete recipe.)
- My Grandma always used Bon Appetit Seasoning Salt as the secret seasoning in her vegetable dip, but it’s no longer being made (sob!) If you still have Bon Appetit, use it, but now I use Beau Monde Seasoning (affiliate link). If you’re in Europe you can also use Trocomare Seasoning. (affiliate link)
- Grate a small amount of raw onion into a bowl. (I use the large side of a box grater; don’t use a microplane grater which just turns the onion to liquid.)
- Add mayo and sour cream to bowl.
- Then add Beau Monde Seasoning and dried dill weed (affiliate link).
- Mix all ingredients together well with a whisk. You can use a food processor as well, but the whisk is quicker.
- Let the dip chill in the refrigerator for at least an hour or two for best flavor.
- Serve with raw vegetables like celery, sugar snap peas, bell pepper strips, jicama, radishes, broccoli, or cauliflower.
- This is also good with carrots or as a dip for baked sweet potato fries for those who don’t mind more carbs.
- I tested this out on my friend Robin and she gave it two thumbs up!
More Tasty Vegetable Dips You Might Like:
Weekend Food Prep:
This recipe has been added to a category called Weekend Food Prep where you’ll find recipes you can prep or cook on the weekend and eat during the week!
Ingredients
- 1 cup sour cream (see notes)
- 1 cup mayo (see notes)
- 1 tsp. grated onion
- 2 tsp. dried dill weed
- 2 tsp. Beau Monde Seasoning (see notes)
Instructions
- Grate onion into a bowl, using the large side of a box grater or flat grater (not a microplane grater.)
- Add all other ingredients to the bowl and stir together with a whisk (or you can use a food processor, but it’s not necessary.)
- Chill an hour or so before serving.
Notes
I only use Daisy full-fat sour cream and full-fat mayo for this recipe but if you prefer to make a lower-fat version of the recipe you can definitely use reduced fat sour cream and mayo.
My Grandma always used Bon Appetit Seasoning for this. When that was discontinued I started making it with Beau Monde Seasoning (affiliate link), which is almost identical in flavor.
This will keep in the refrigerator for several weeks. Nutritional information doesn’t include vegetables and is calculated on 1/4 cup serving size.
Recipe from my Grandma Denny, who was a wonderful cook!
Nutrition Information:
Yield:
8
Serving Size:
1
Amount Per Serving:
Calories: 245Total Fat: 26gSaturated Fat: 6gUnsaturated Fat: 18gCholesterol: 29mgSodium: 564mgCarbohydrates: 2gFiber: 0gSugar: 1gProtein: 1g
Nutrition information is automatically calculated by the Recipe Plug-In I am using. I am not a nutritionist and cannot guarantee 100% accuracy, since many variables affect those calculations.
Did you make this recipe?
Did you make this recipe? Please leave a star rating (under the PRINT button in the recipe) or share a photo of your results on Instagram! THANKS!
Low-Carb Diet / Low-Glycemic Diet / South Beach Diet Suggestions:
Grandma Denny’s Homemade Ranch Dip is great for low-carb diets.Eat with low-carb vegetables like celery, sugar snap peas, jicama, bell pepper strips, radishes, broccoli, or cauliflower for low-carb diets. If you’re making this for the original South Beach Diet the Greek Yogurt Ranch Dip variation above is better for South Beach.
Find More Recipes Like This One:
Use Appetizers to find more recipes like this one. Use the Diet Type Index to find more recipes suitable for a specific eating plan. You might also like to follow Kalyn’s Kitchen on Pinterest, on Facebook, on Instagram, on TikTok, or on YouTube to see all the good recipes I’m sharing there.
Historical Notes for this Recipe:
Kalyn was making this dip recipe long before the existence of the internet, and it was first posted on this site in 2005 (probably without a single photo in those days.) The recipe was last updated with more information in 2023.
Share This:
We are a participant in the Amazon Services LLC Associates Program, an affiliate advertising program designed to provide a means for us to earn fees by linking to Amazon.com and affiliated sites. As an Amazon Associate, I earn from qualifying purchases.
Join the Conversation (0)
Nutrition Facts
Amount per serving
- Calories N/A
- Total Fat N/A
- Saturated Fat N/A
- Cholesterol N/A
- Sodium N/A
- Total Carbohydrates N/A
- Protein N/A
Hi, I'm Alex!
I love sharing easy, healthy, and family-friendly recipes that anyone can make at home.

Be the first to comment on this recipe!