
Awesome Kung Pao Shrimp is filled full of flavor with large shrimp, tender bell peppers, nutty peanuts cooked together with a sweet and spicy sauce. Ready in under 20 minutes!
This is totally better than take out! If you love Chinese food as much as I do try these favorites of mine: Sweet and Sour Shrimp, Instant Pot Beef and Broccoli or Slow Cooker General Tso’s Chicken.
Kung Pao Shrimp
You guys! This kung pao shrimp is going to rock your world. It is that good!
This is a tried and true recipe that I love and had to share with all of you.
All the flavors from this dish are busting in your mouth. Every bite is to die for!
From a sweet and spicy glaze, crunchy peanuts, tender bell peppers and thick, large shrimp this dish is sure to please.
I do love a good kung poa dish!
Try my Skinny Slow Cooker Kung Pao Chicken or Baked Kung Pao Chicken if you prefer to use chicken instead of shrimp.
What you need to make Kung Pao shrimp
Don’t let this list of ingredients intimidate you!
Most of the items you already have and some of them you are going to want to have for more Chinese recipes.
These are simple ingredients and you will see how quick they are to put together.
All these ingredients make the perfect blend with flavor and texture making this Chinese dish one to remember.
Skip the takeout and enjoy some kung pao shrimp at home!
- Olive Oil: helps for sautéing and keeping from sticking to the pan.
- Bell Peppers: red and green cut into chunks.
- Garlic Cloves: minced.
- Shrimp: large, peeled and deveined.
- Salt and Pepper: for extra seasoning.
- Soy Sauce: bringing out the authentic Chinese meal.
- Sesame Oil: adds extra flavoring.
- Brown Sugar: add a little sweetness to the meal.
- Sriracha: bring on the heat!
- Red Pepper Flaked: a pinch for texture and more spicy aftertaste.
- Cornstarch: thickens the sauce.
- Water: creates a smooth textured sauce.
- Peanuts: crunchy and yummy!
How to make Kung Pao shrimp
Dinner is served in less than 20 minutes! You can’t beat that!
I love how quickly shrimp cooks up and is ready in minutes.
Using only one dish for this meal makes this super simple and clean up a breeze.
Whisking your sauce will take minutes to make and makes this dish just pop!
You will love the blended flavors of the sauce over your shrimp.
All together this meal is a tried and true favorite and you can’t go wrong with it!
- Cook your shrimp: In a medium sized skillet add the olive oil over medium high heat. Add the bell pepper and garlic and sauté until almost tender. Add the shrimp and cook for 2-3 minutes until pink.
- Make your sauce: In a small bowl whisk soy sauce, sesame oil, brown sugar, sriracha, and red pepper flakes. Mix together the cornstarch and water and whisk into the sauce. Pour sauce over the shrimp mixture and add peanuts.
- Combine and sauté: Sauté until it starts to thicken and coat the shrimp. Garnish with sliced green onions if desired.
Preparing and cooking shrimp
Shrimp is so easy to cook and takes just a matter of minutes.
Cooking shrimp to perfection is key! Just watch the color of the shrimp go from gray to a light pink in minutes.
You know it is cooked through when it is pink and only 1 to 2 minutes on each side.
Try to watch them carefully and not over cook your shrimp.
Preparing shrimp:
This is a great way to
- When peeling your raw shrimp, pull the shell and tear it away from the first segment of the shell.
- Make a shallow cut along the spine of the shrimp or the back of the shrimp.
- Take the back strip of the intestines and remove them with a knife or fork.
- Remove tails by simply squeezing the shrimp and pulling the tail off.
Cooking shrimp:
- Shrimp is best cooked just barley enough but not too much that it is overcooked.
- When overcooking your shrimp you are left with a chewy, gummy texture and tend to have a fishier taste.
- Once the shrimp turns an off white, pinkish color you will know it is ready to get off the skillet.
- Another sign of being done or starting to overcook is the shrimp will begin to curl itself around.
- Cook your shrimp hot and quickly. Sometimes I find myself turning up the heat to cook the shrimp and the sauce together.
- This will help thicken your sauce as well as help your shrimp cook through just enough.
What to serve with Kung Pao Shrimp
Make this a complete meal with a few side dishes to enjoy.
We always love my fried rice. There are so many ways of making it. It is already a tried and true recipe that everyone loves.
A quick 20 Minute Vegetable Lo Mein dish is always easy to make and ready at the same time as the Kung Pao shrimp.
Steamed Vegetables or even Cauliflower Fried Rice is just as tasty and brings in more added flavors.
Storing Kung Pao Shrimp
This Kung Pao shrimp is perfect for meal prepping, making ahead or simply freezing it for another day.
It is nice to have a few options for a meal that is so tasty and irresistible.
This is ready in minutes and reheats well!
Freezing Kung Pao shrimp after it is cooked:
We usually don’t have left overs but with this dish I always hope that there will be just enough for me to enjoy the next day for lunch.
- Place your cooked, but cooled down Kung Pao shrimp in an airtight container or ziplock bag. Remove all excess air.
- I like to lay my bags flat so the ingredients are not all at the bottom.
- Freeze for 1 to 2 months.
Freezing Kung Pao shrimp before it is cooked:
This is the best way to freeze Kung Pao shrimp!
- If you can, freeze this meal in separate bags. Portion each ingredient into each bag.
- Non-cooked shrimp, cook and prepare vegetables and sauce each go in their own separate bags.
- Then in a larger bag add each of those baggies inside to keep them all together. Freeze for about 2 to 3 months.
Reheating Kung Pao shrimp:
You will want to be careful not to overcook the ingredients.
This will still be prepared and made within 20 minutes!
- When ready to reheat, remove shrimp from freezer and completely thaw.
- Once shrimp has thawed, follow the recipe below on cooking shrimp in the skillet.
- Then add frozen bell peppers and cook through. Add the shrimp next.
- Add the sauce on top and stir together and enjoy while it is steaming hot!
Here are more shrimp recipes:
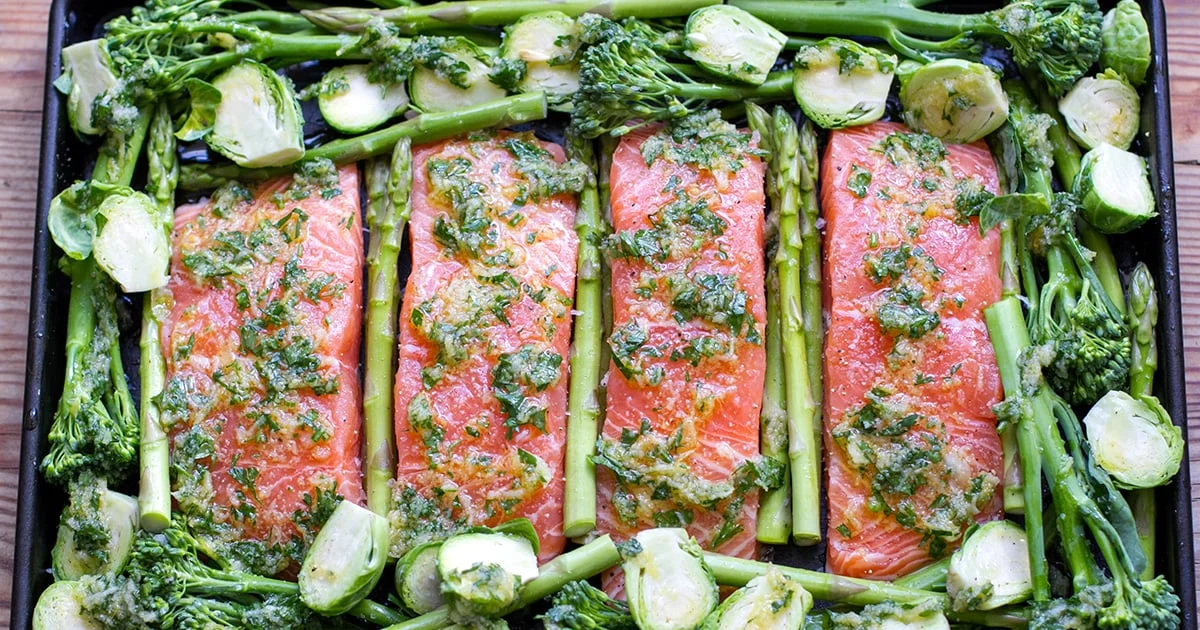
Sheet Pan Salmon & Green Vegetables With Herb Garlic Sauce
This healthy and nutritious sheet pan baked salmon with herb & garlic sauce and green vegetables is quick and easy and suitable for paleo, keto, whole30 and AIP diets.
Not sure if you’ve noticed, but I’ve been obsessed with quick and easy sheet pan meals recently. You might have tried my chorizo, chicken and asparagus bake, this quick and easy baked spiced cod with Brussels sprouts, my mushroom with balsamic chicken and onions, or my Italian sheet pan baked eggs. Today, I’m giving you a nutritious, delicious, super food packed meal of baked salmon with zesty herb and garlic sauce and green vegetables.
This sheet pan meal ticks so many boxes: paleo, keto, AIP and Whole30 friendly, it’s a perfect meal for anyone doing a reset. It has loads of green veggies, it has omega-3s rich fish, it’s quick and easy, and most importantly, it’s full of flavour.
Cook’s notes
I am using salmon fillets because I love oily fish and my partner really likes this particular type of fish. You can use any other part of salmon, like salmon steaks which are cheaper, or any other fish that suits your budget and location.
You can also make this with prawns or chicken instead of fish. For prawns, start baking the vegetables earlier and add the prawns in the last 5 minutes as they don’t need much time to cook. For chicken, it’s the other way around. Slice the chicken fillets into thinner strips and bake for 5 minutes before adding the vegetables, then cook for 15 more minutes together, so a total of 20 minutes for thin strips of chicken.
Description
This healthy and nutritious sheet pan baked salmon with herb & garlic sauce and green vegetables is quick and easy and suitable for paleo, keto, whole30 and AIP diets.
For the sauce
For the rest
- Preheat the oven to 200 C / 400 F.
- Mix together the sauce in a small bowl and set aside.
- Grease a large sheet pan or flat-ish baking tray with about a tablespoon of olive oil and place the salmon fillets in the middle, leaving about an inch of space in between. Spread even amounts of the sauce over the top of each salmon fillet.
- Scatter the green vegetables around and in between the fillets, overlapping each other is fine. Drizzle the vegetables lightly with olive oil (about 2 tablespoons) and the juice of half of the remaining lemon. Sprinkle with a few pinches of sea salt and pepper.
- Place the tray in the oven for 15 minutes, rotating halfway if your oven is slightly uneven in temperature (like mine).
- Serve while hot with any additional vegetables, salads, or starchy carbs, if you needed.
Nutrition
- Serving Size:
- Calories: 403
- Sugar: 4.4 g
- Sodium: 458.2 mg
- Fat: 22.2 g
- Saturated Fat: 3.4 g
- Carbohydrates: 14.8 g
- Fiber: 5.5 g
- Protein: 41.7 g
- Cholesterol: 82.9 mg
Keywords: Salmon, Sheet Pan, Dinner, Asparagus, Sprouts, Healthy, Gluten-Free, Low-Carb, Keto
Join the Conversation (0)
Nutrition Facts
Amount per serving
- Calories N/A
- Total Fat N/A
- Saturated Fat N/A
- Cholesterol N/A
- Sodium N/A
- Total Carbohydrates N/A
- Protein N/A
Hi, I'm Alex!
I love sharing easy, healthy, and family-friendly recipes that anyone can make at home.

Be the first to comment on this recipe!