
These turkey burgers are loaded with flavor and perfect for summer grilling! Easy to prep ahead and freeze to enjoy all summer long.
Summer is on its way and we are all about the grilling these days! If you love grilling as much as we do, check out these Asian Barbecue Burgers, this Awesome Grilled Salmon with Avocado Salsa or these Grilled BBQ Chicken Tacos for more ways of grilling this summer.
Grilled Turkey Burgers
We love swapping beef for ground turkey to make our favorite recipes a little lighter but they are still big on flavor! These healthy turkey burgers are one of our favorite dinners to make in the summer time. They are light and tasty with a flavorful amount of deliciousness. The ground turkey is so lean and flavorful. Adding in the remaining ingredients to create a round patty makes these burgers over the top. This is a MUST make this summer time.
These turkey burgers are seasoned with onion, garlic, and lots of herbs and seasoning (and just the right amount of spice!). I like to add a bit of barbecue sauce right to my turkey burger mix to give them even more barbecue flavor! This summer these grilled turkey burgers are going to be a hit. My hubby loves to make these and does a great job keeping them juicy and tender. Add all your favorite toppings on your burger and your favorite bun. Impress your family with this flavorful juicy turkey burger!
Juicy Turkey Burger Ingredients:
Easy and simple ingredients that will go along way. The turkey meat is the most important and adding in the filing just enhances each patty to the fullest!
- Ground Turkey: 93/7 is a great turkey meat and what I used.
- Bread Crumbs: The bread crumbs will help keep the burger patty from falling apart while being grilled.
- Dijon Mustard
- Worcestershire Sauce
- Garlic
- Egg: Holds it all together
- Salt and Pepper to taste
Let’s Grill a Turkey Burger from Scratch:
Grilling up some turkey burgers during the summer time just got easier with this homemade version. We love how quick and easy these burgers are to make. They turn out so tender and juicy every time.
- Make a Turkey Patty: Throw your ground turkey, seasonings, barbecue sauce, egg and bread crumbs into a big bowl and mix it up just until combined — you don’t want to over mix!
- Shape your Burgers: Be sure to make your patties a little larger than your buns because they will shrink up on the grill as they cook.
- Lay Patties Flat: Place your patties on a parchment lined plate or baking sheet and pop in the freezer for 20-40 minutes. I find this helps them to keep their shape and not fall apart on the grill. It’s not totally necessary, but you’ll have to be a little more careful with the flipper if you don’t give them a bit of a chill.
- Grill Patties: Grill for 5-6 minutes per side, until browned and the internal temperature reaches at least 165 degrees Fahrenheit.
Tips to Keep Turkey Burgers Juicy:
My recipe is deliciously flavored and keeps the turkey moist and rich throughout the process from making a turkey patty to grilling it. Here are a few extra tips to ensure the turkey burger is prepared and grilled to perfection!
- Milk: Add a little milk to the turkey burger mixture. This can help keep the meat moist as well as tender while grilling.
- Butter: Just to ensure a moist and juicy burger even if it is over cooked, adding a slice of butter to the tops of each patty before cooking helps eliminate any mishaps.
- Overcooking: It is best to use a meat thermometer to check the burgers while grilling. Turkey burgers can be overcooked and dry out easily. Once the internal degrees reaches 165 degrees Fahrenheit, remove them from heat immediately.
Top your Burger:
For a stackable burger add in all of your favorite toppings in between your buns. Here are a few ideas!
- Avocado
- Red Onions
- Tomatoes
- Lettuce
- Pickles
- Bacon
- Fried Egg
- Ketchup
- Mustard
- Mayonaise or Miracle Whip
- Fry Sauce
- Barbecue Sauce
What Goes Well with Turkey Burgers?
These Turkey Burgers are some of our favorite to whip up for a healthier twist on burgers but they still have the full burger effect. Adding fries, salad and even topping over the turkey burger is perfect for making a complete meal.
Making Burger Patties Ahead of Time:
Burger patties, beef or turkey, are great for making ahead in the summer as they can easily be refrigerated or frozen.
- Refrigerate: Simply prepare the patties as the recipe instructs, then place in a single layer or stack with wax paper in between layers. Cover and refrigerate up to 24 hours.
- Can you Freeze Patties? Yes! Place patties in a single layer on a baking sheet on parchment paper. Freeze for 2 hours or until firm. Remove from the baking sheet and place in a large freezer bag or air tight freezer container and freeze for up to 3 months. You can grill right from frozen!
More Delicious Burger Recipes to Try:
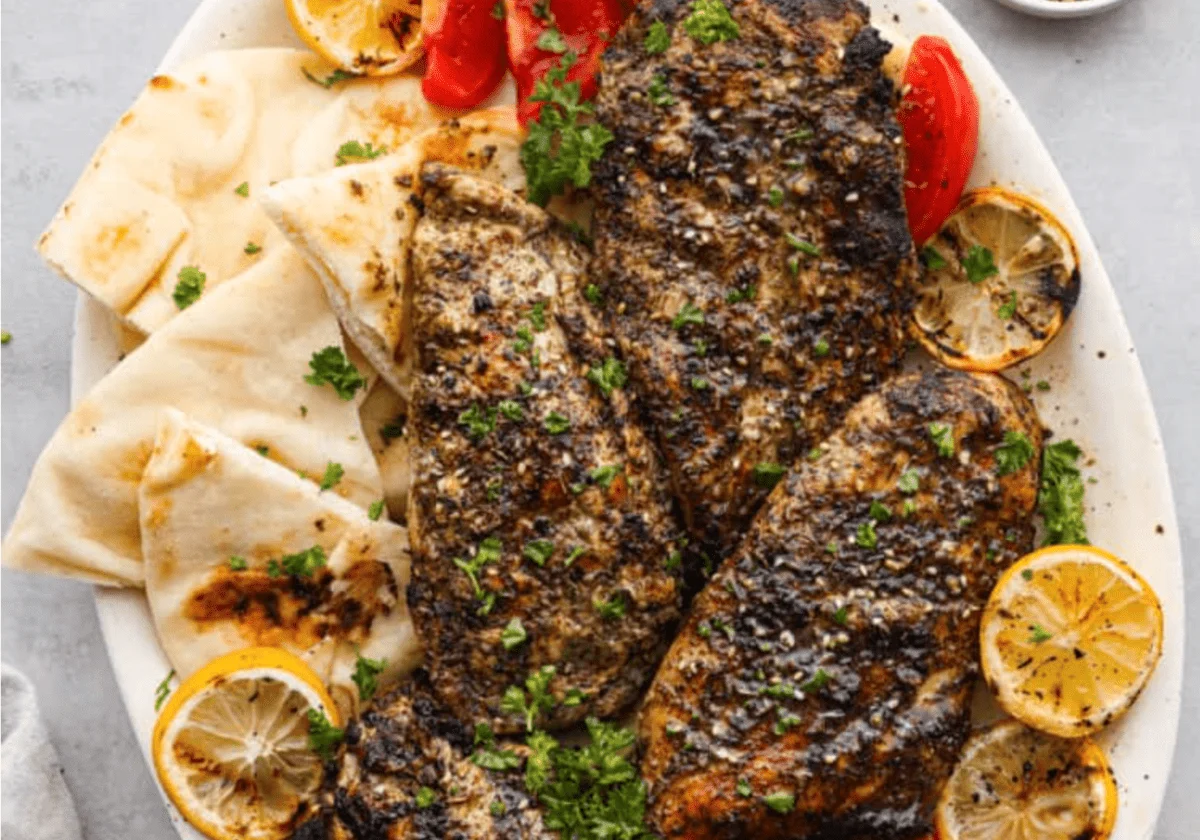
Za’atar Chicken
Seasoned with a traditional Middle Eastern Za’atar spice blend and grilled, this Za’atar chicken is juicy and packed with unique flavors. In just 20 minutes you’ll have a flavorful and filling dinner that no one will forget!
If you have never heard of Za’atar seasoning, you are not alone! I just heard of it recently, and now I’m hooked! It’s a great savory blend of warm and earthy seasonings that will really wow your taste buds. You can also make the spice at home! If you like homemade spices, you’ll have to try this Homemade Fajita Seasoning, this better than store bought Italian Seasoning, and this Taco Seasoning too!
Grilled Za’atar Chicken
So at this point you may be wondering what is Za’atar seasoning? It is a blend of savory, nutty, and earthy spices that usually includes oregano, thyme, marjoram, and sumac. There are different blends of Za’atar seasoning based on where you are eating it. Kind of like curry the ingredients can change based on the area it’s made in. I have a link to the Za’atar seasoning blend in the recipe box below too if you want to make it, or you can pick it up from the store.
Grilled Za’atar Chicken is quickly marinated in the Za’atar seasoning and olive oil and grilled to perfection. I really think you are going to love this dish! It’s an easy 20 minute dinner that would go great with some pita bread and hummus. I also love with baba ganoush which goes great with this Za’atar seasoning. You can actually sprinkle some on top and the flavor is incredible. I think this will be a new family favorite!
Ingredients
These simple ingredients combine to make the most delicious and moist chicken. This Za’atar chicken is so unique, and amazingly flavorful! If you are looking for a great easy dinner, then this is the recipe for you! See the recipe card below for exact measurements.
- Boneless Skinless Chicken Breasts: If you get a breast that is really thick, then you’ll want to flatten it out a bit so that it will all cook evenly on the grill.
- Olive Oil: Olive oil is a must for this recipe. It’s a great quality oil that helps the flavors in the seasonings really pop.
- Lemon Juice: Lemon juice is just what this recipe needs to bring out all of these gorgeous flavors!
- Za’atar Seasoning: I love making this blend at home! It is really herby and nutty, and perfect on meat. I add sesame seeds, coriander, and salt to my blend and I think it’s fantastic!
- Garlic: Minced garlic is one of my favorite things to eat on chicken. It’s so full of flavor and makes every bite the perfect one!
Za’atar Chicken Recipe
This recipe is so easy! I love how quickly it comes together and it really is so delicious. I ate it with some tomatoes and pita bread and it was perfection. Some of my kids added salt and pepper, but I thought it was perfect the way it was. You can make it however you like, and I know you are going to love it!

- Whisk: In a small bowl, whisk together the olive oil, lemon juice, za’atar seasoning, and garlic.
- Put in Bag: Place the chicken breasts in a resealable plastic bag then pour the mixture over the chicken.
- Refrigerate: Seal the bag and refrigerate for 30 minutes or up to overnight.
- Grill: Grill chicken breasts on medium-high heat for 7-8 minutes per side or until internal temperature reaches 165° Fahrenheit.
- Enjoy: Let the chicken rest before slicing and enjoying!
Tips for Grilling Chicken
Here are a few simple ways to make yourself the master of the grill! Once your friends and family get a bite of your grilled Za’atar chicken, they’ll be hooked. It’s hard not to be when they’re so juicy and flavorful.
- Use a Thermometer: This step is super important so that your chicken doesn’t dry out on the grill. Use a meat thermometer to check the temperature of your chicken. You can take them off the grill when the temperature inside reaches 165 degrees Fahrenheit. If you cook them any more than that, they may dry out.
- Let Rest: The key to juicy grilled Za’atar chicken is letting it rest for a minute or two after you pull it off the grill. This allows all of the tasty juices to reabsorb, giving you chicken breast that will melt in your mouth! If you cut into them too soon after grilling, those juices may be released instead of absorbing back into the meat.
- Dripping: If you have seasoning and oil dripping off of your chicken, it will make the flames touch the meat and that’s where the black burned part comes from. If you don’t want crispy crunchy parts on your chicken, make sure that your seasoning is all over your chicken, but not dripping off.
Storing Leftovers
Who doesn’t wan’t grilled Za’atar chicken for leftovers? This recipe makes enough to serve eight people, so if you need to save your leftovers here is how.
In the Refrigerator: Store your cooled chicken in an airtight container in the fridge for up to 4 days.
More Chicken Recipes
I love a simple chicken dinner! But sometimes chicken can taste boring when you are always making it the same way. Here are some recipes that will give you great ideas to keep your chicken tasting unique and juicy!
Join the Conversation (0)
Nutrition Facts
Amount per serving
- Calories N/A
- Total Fat N/A
- Saturated Fat N/A
- Cholesterol N/A
- Sodium N/A
- Total Carbohydrates N/A
- Protein N/A
Hi, I'm Alex!
I love sharing easy, healthy, and family-friendly recipes that anyone can make at home.


Be the first to comment on this recipe!