

Learn how to slow-cook a whole beef brisket in the oven with a delicious, caramelised balsamic and Worcestershire reduction, onions and garlic. This oven-cooked brisket is braised in the broth that is then caramelised and the meat is browned during the roasting process, resulting in the most succulent meat full of flavour.
I am going to cover a few brisket basics first, but feel free to press the Jump To Recipe button above to get straight to business. This is a gluten-free, paleo-friendly, dairy-free beef brisket recipe.
Slow Cooked Brisket In The Oven
I’ve been meaning to do a beef brisket recipe on the blog for A LONG time! I know it’s something my readers have asked for and also because many people are a little intimidated by this cut of meat.
Many think that the brisket requires a BBQ or smoking or that it takes a very long time. But, while it is one of those cuts that needs a little love and time to cook, it’s actually very easy to handle and I will show you how to make a beautiful baked brisket in the oven.
In this recipe, we are slow-cooking the brisket in the oven for 3 hours on low to moderate heat. It’s half-braised in a delicious broth, which slowly cooks down to form the most decadent reduction – our brisket sauce.
Once you’ve done all the prep, you only need to check on the brisket a few times; otherwise, it’s a very simple process. DO NOT FEAR THE BRISKET!
What Is Beef Brisket?
Brisket is a cut of meat from the breast or lower chest of beef. This part has a lot of connective tissue so it’s considered a tough cut and requires the correct cooking method to make it tender.
The brisket is made up of two different muscles or parts: the point and the flat. The point cut is more elongated and is the fattier part of the brisket; the flat cut is a bit leaner and is more square/rectangular looking, allowing it to lay flat. You can use either of those in this recipe.
Both parts (which often are sold as one whole brisket) should have a fat cap or fat layer on them. You can trim some of that back but it does render (melt away) during cooking and provides a lot of flavour and moisture to the meat, so don’t cut all the fat off!
Brisket nutrition is very similar to other beef cuts; it’s high in protein and moderate in fat and zero carbs, with lots of iron, selenium and zinc and B-vitamins, especially B12 so it will give you lots of energy and antioxidants.
How Much Brisket Per Person?
This is actually a very good question because as with most slow-cooked meats, brisket will shrink during cooking (from 100% to about 60%) so you need to take that into consideration when planning your menu. As brisket has a bit of fat on it and some marbling throughout, it’s a satiating beef cut so you don’t need as much of it as lean beef. Plus, it also depends on what else you are serving with the brisket.
If you’re serving mostly brisket, you’d want to allow for 200-300 grams or 8 ounces of cooked brisket or more for hungry tummies. In my case, we served the meat with a coleslaw salad and sweet potatoes on the side, so 150-200 grams or 5-7 ounces of brisket was sufficient. I purchased a 1kg/2lb flat cut brisket with a fat cap on the top (outer side), and trimmed fat on the bottom. It served 6 (4 adults and 2 kids).
For 6 adults and a couple of sides to go with the meat, I’d say get a 1.2-1.5 kg / 2.5-3 pound brisket. The recipe will work for that amount of meat as well.
How To Cooke A Brisket In The Oven
You will find the full list of ingredients, instructions and nutritional breakdown in the recipe card below. Here are some steps showing you how to prepare and cook a brisket in the oven. Begin by removing the brisket from the fridge to bring it to room temperature (if you plan to cook it right away).
Brisket Rub
The first thing I do is prepare the spiced brisket rub. To be honest, you can use whatever spices you have on hand. Even just salt and pepper will work. I went with a few of my favourites like smoked paprika, onion and garlic powder and cumin. Mix it with salt and put it aside.
How To Trim A Brisket?
As I mentioned above, the brisket will come with a layer of fat on top (usually). I like to trim off some of the thicker parts, I just slice the top layer of the fat off. But, I still leave a lot of the fat on to flavour the meat and keep it moist while cooking.
You can leave all the fat on as it will melt down while roasting. I find that too much fat would end up in my broth and the sauce can get a little oily but that’s a personal preference.
Next, rub the brisket with the spice rub evenly on all sides. At this stage, you can store the brisket in the fridge overnight to infuse it with all those spices or you can get straight to cooking.
Step 1. Preheat the oven to 170 C/ 338 F.
Step 3. Sear the brisket on both sides. You can do this in a frying pan or directly in the oven tray over medium heat on the stove. I add a little oil first and cook for 1-2 minutes on each side.
Step 3. Prepare the ingredients for the broth in the meantime. Remove the brisket and pour in the stock to deglaze the bottom of the pan. Turn the stove off. Stir in the garlic, onions, Worcestershire sauce, balsamic and Tamari soy sauce (or coconut aminos). This will be our braising broth that will turn into a sauce/reduction.
Step 4. Place the brisket on top of the onions (fat cap side up!) and nestle it into the broth. Cover the whole tray tightly with foil and place in the oven for a total of about 3 hours.
Step 5. You have to check the brisket after every hour. Remove the tray carefully and lift the foil off. Use a spoon to stir the broth around and baste the brisket with a few tablespoons of the liquid. After the second hour, you will see that the meat is starting to brown and the broth is reducing into a thicker sauce. Scoop some of the onions and garlic pieces on top of the meat as well when basting with the sauce.
In the last hour of cooking, I like to check it twice (every 30 minutes) because this is when the sauce can sometimes reduce too much on one side of the pan (say the hotter part of your oven). If it looks like the sauce is thickening and starting to look too sticky, add a little more stock or water and stir through. You want to avoid burning the reduction!
After 3 hours, turn the oven off and leave the brisket to rest for 10-15 minutes. You can also remove the tray and let it rest under foil for a bit. After that, transfer the brisket to a cutting board and slice it into whatever thickness slices you like. Scoop all of that gorgeous, caramelised reduction and onions on top.
More Tasty Beef Recipes To Try
- Preheat the oven to 170 C / 338 F.
- Wash and pat dry the brisket. Leave the fat cap on (usually on one side) but feel free to trim off particularly thick areas, which is what I did. Don’t remove the fat altogether as it keeps the brisket moist and adds a lot of flavour.
- Mix the spice rub in a bowl and cover both sides of the brisket. Rub it in on all sides using your hands. If not in a rush, place the brisket into a Ziploc bag or a container and refrigerate overnight. Make sure to bring to room temperature before cooking.
- Place a heat-proof metal baking tray (not ceramic or glass!) over high heat on the stove. Place it so that the flame hits the middle of the pan. You can also do this part in a large skillet or a frying pan.
- Add a tablespoon of oil and once hot, place the brisket in the middle, fat side down. Cook for 1-2 minutes to sear the spices. Turn over, add another splash of oil underneath, and cook on the meat side down for 1-2 minutes, just to brown off the spices a little. Remove the brisket to a plate.
- Add the onions and garlic to the tray and pour in a little bit of the stock. Stir through to deglaze the bottom of the pan and scrape off all those sticky spice rub bits. Now pour in the remaining stock, Worcestershire sauce, balsamic and Tamari soy sauce (or coconut aminos). Stir through and move the onions and garlic to the middle.
- Place the brisket on top of the onions in the broth (make sure to keep the fat layer side up!) and splash a few tablespoons of the liquid over the top. Cover the whole tray tightly with foil and pop in the oven.
- Cook for 1 hour, then remove the tray and splash a few more tablespoons of the cooking broth over the top to baste the meat. You can place some of the onions and garlic on top of the meat. Cover with foil again and pop back for 1 more hour.
- After this hour, repeat the basting process. At this stage, the cooking broth will be thickening and caramelising. If you have a taste, it will have a rich, salty gravy-like flavour. I recommend adding another 1/4 cup to 1/2 cup of water and stirring through the cooking broth at this stage. Cover with foil again and cook for 1 more hour.
- After 3 hours, check on the meat and make sure the broth isn’t too thickened or sticky. Turn the oven off but leave the meat in there to rest for 15 minutes. Remove from the oven and rest for a little bit longer under foil.
- Transfer on a board or a platter with reduced sauce and onions on top. Slice into preferred thickness pieces and serve with mustard, your favourite BBQ sauce or simply with a coleslaw, roasted or mashed sweet potatoes, green beans and any other sides you love with roast or BBQ meats.
Notes
Sides for the brisket (this is what I served):
Nutrition
- Serving Size: 2 slices of brisket with some reduction sauce (no sides)
- Calories: 407
- Sugar: 4.8 g
- Sodium: 887.3 mg
- Fat: 24 g
- Saturated Fat: 8.5 g
- Carbohydrates: 11.3 g
- Fiber: 0.9 g
- Protein: 34.4 g
- Cholesterol: 105.2 mg
Keywords: Brisket, Beef, Meat, Gluten-Free, Paleo, Slow Cooking, Sunday Roast
Other Beef Brisket FAQs
Where To Buy Brisket?
Your local butcher is probably your best bet for getting a piece of brisket, however, it is now a popular cut of beef and is frequently found in the supermarket. Look for it in the beef section, usually next to roasting cuts.
How To Slice Brisket?
Properly, slow-cooked brisket should be juicy and tender and is easily sliced with a knife. I like to do 1-cm slices but you can also dice it. Cut from the fat cap layer down.
What To Serve With Brisket? Best Sides For Brisket?
Traditionally, smoked or BBQ-ed brisket is served with all the expected trimmings of coleslaw, fries, pickles, corn on the cob, potato salad or baked potatoes, collard greens, mac’n’cheese and so on.
If you eat bread, soft bread rolls, wraps or tacos can be used as vessels for the brisket. For a lower-carb meal, opt for a nice coleslaw and sweet potato baked fries or a nice cauliflower mash on the side.
What To Do With Leftover Brisket?
IF you have any leftover brisket, there are many tasty ways to enjoy it. Store it in the fridge for up to 3 days (well-covered) and use it to make things like:
- Brisket nachos or tacos
- Brisket wraps, rolls or sandwiches
- Diced it finely and trow in a brisket fried rice (with regular or cauliflower rice)
- Top your favourite bowl of salad for extra protein
- Brisket and eggs for hearty breakfast
- More ideas for leftover brisket here.
How To Reheat Brisket?
I usually do it in a small frying pan with a little oil or a splash of water. You can also reheat in the oven at 200 C/395 F for 5-10 minutes or in a microwave on HIGH for 1 minute or so. Cold brisket is also quite nice.
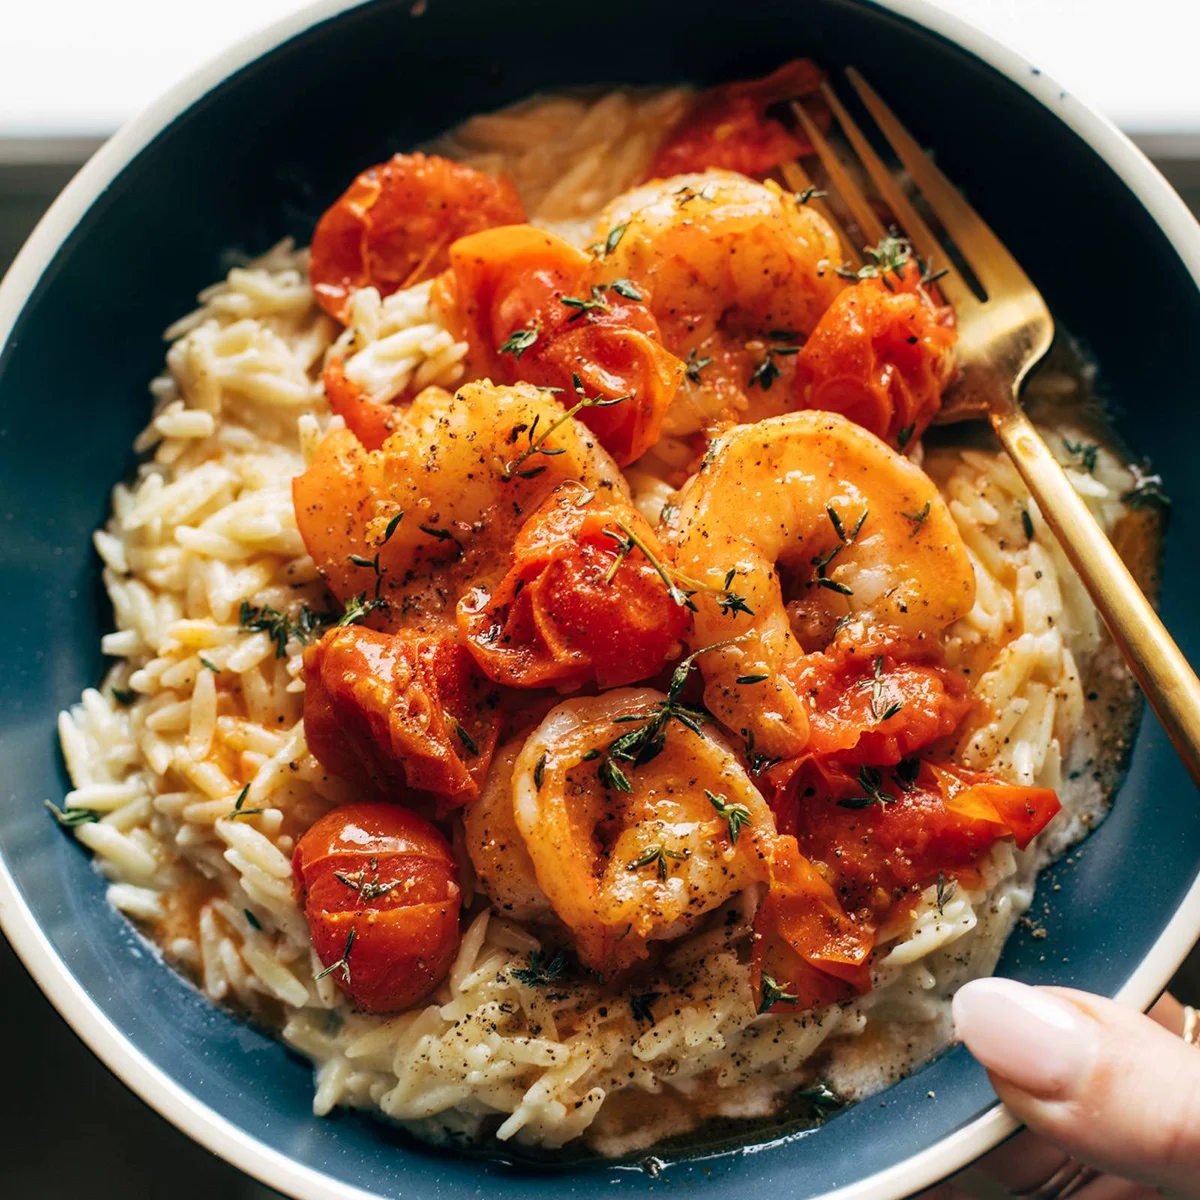
Garlic Shrimp and Tomatoes with Parmesan Orzo Recipe
Shrimp laced with buttery garlic and thyme and a burst tomato sauce served on a creamy Parmesan orzo.
Juicy, succulent shrimp laced with garlic, butter, and thyme, tucked into a silky burst tomato sauce, and piled high on creamy, luscious Parmesan orzo. WHAT A DREAMBOAT DINNER. I love this recipe!
In This Post:
How To Make This Garlic Shrimp and Tomatoes (with Pictures)
Step 1: Blister and Smash the Tomatoes
Get the tomatoes hot and blistery; then give ’em a gentle smash with the back of a spoon or a small plate. It’s… very fun.
Step 2: Cook the Shrimp
Make a little clearing right in the center of the tomatoes where you can add your shrimp to cook for a couple of minutes. Salt it up!
Step 3: Get the Garlic and Butter Going In There
Throw in a bunch of freshly sliced garlic and a knob of butter. Stir it up a few times until it’s dreamy.
Step 4: Make a Creamy Orzo
Put a lid on the shrimp and make a quick creamy orzo – butter, Parmesan, cream, lemon, and salt.
Step 5: Put It All Together
Piping hot orzo goes on the plate first, and then we pull our shrimp and tomatoes back out to pile on top.
Lindsay’s Notes
This recipe is in heavy rotation at the moment – and it never fails to make me feel like I’m eating at a fancy restaurant and/or generally have my life together. Is my laundry all over my table? Yes. Have I been using dry shampoo for the last 4 days? Yes. But am I also eating a kind of fancy and beautiful dinner? YES! Three cheers for doable “fancy” recipes. 10/10 recommend.
Creamy orzo with the twang of Parmesan, sweet burst tomatoes gently bubbled into a sauce, and a pile of jumbo, delicate, buttery, garlic-laced shrimp. Pass me a glass of wine and I am living my best life.
As far as family approval goes, Bjork and I love the whole big, beautiful thing – no thyme for him (a true crime and I don’t want to spend any more time talking about it), and lots of thyme, salt, and pepp for me. The girls are hit and miss with the shrimp and tomatoes, but you better believe they love the creamy Parmesan orzo which is, of course, just mac and cheese in disguise. They’ll usually eat a few of the fresh little tomatoes on the side, too. Winning for everybody!
Description
Shrimp laced with buttery garlic and thyme and a burst tomato sauce served on a creamy Parmesan orzo.
Garlic Shrimp and Tomatoes:
Creamy Orzo:
- Cook the Orzo: Cook according to package directions. Drain, toss with a bit of oil, and set aside.
- Soften the Tomatoes: Add the tomatoes and olive oil to a pan over medium high heat so they can soften and get a bit blistered on the outside. I usually cover the pan to avoid extra splatters.
- Smash the Tomatoes: Once they’re soft (5 minutes or so), give them a gentle smash with the back of a spoon or applying even pressure with a plate or similar flat object. You want the tomatoes to be partially burst / smashed so they release some juices.
- Cook the Shrimp: Make a little clearing in the center of the tomatoes and add your shrimp right in; season them with 1/2 teaspoon salt and cook for 2 minutes on each side.
- Give it Some Flava-Flave: Add the garlic, butter, and 1/2 teaspoon salt to the pan and stir to mix it all together. Let it get saucy and bubbly; then remove from heat and cover with a lid.
- Make the orzo: Mix the orzo with butter, half and half, Parmesan, and lemon. Stir to combine; warm it up over the heat if necessary.
- Pile it up: Serve immediately so the orzo doesn’t get too starchy and sticky! Pile it on a plate with a big scoop of steamy shrimp and tomatoes. Top with thyme. So good!
Notes
This amount usually makes enough for just Bjork and I to finish the shrimp, with plenty of orzo for us and the girls. If you wanted to serve 4 adults, I would use 2 pounds of shrimp!
- Prep Time: 10 minutes
- Cook Time: 40 minutes
- Category: Dinner
- Method: Saute
- Cuisine: American
Keywords: shrimp and orzo, orzo recipe, shrimp and tomatoes
Recipe Card powered byFrequently Asked Questions For Garlic Shrimp and Tomatoes
What can I use instead of shrimp?Chicken would be delicious! I would probably pan-fry the chicken first, then take it out and set aside while you build your tomato sauce, then add the chicken back in at the end.
How long do the leftovers last?You can definitely eat this meal as leftovers for 1, maybe 2 days after you make it, but it’s one of those meals that really shines when it’s made fresh.
Can you make this vegetarian / meatless?Use zucchini in place of the shrimp! Or, similarly, this recipe is great.
How do you make this gluten-free and/or dairy-free?Use gluten free orzo, dairy-free butter (or olive oil), and something else creamy in place of the half and half and Parmesan – a knob of dairy-free cream cheese would be good!
Another option would be to skip the creamy orzo and serve this with quinoa or another gluten-free, dairy-free option.
My Favorite Shrimp Recipes
Join the Conversation (0)
Nutrition Facts
Amount per serving
- Calories N/A
- Total Fat N/A
- Saturated Fat N/A
- Cholesterol N/A
- Sodium N/A
- Total Carbohydrates N/A
- Protein N/A
Hi, I'm Alex!
I love sharing easy, healthy, and family-friendly recipes that anyone can make at home.

Be the first to comment on this recipe!