

If you’re looking for a meal bursting with flavour, try these honey lemon garlic pepper chicken thighs. Pan-fried for golden skin, then baked and finished with a mouthwateringly sweet, tangy and citrusy sauce. A must-bookmark for chicken thigh recipes!
Honey Garlic Lemon Pepper Chicken Thighs
Pan-fried for golden skin, then baked and finished with the magical sweet, tangy and citrusy sauce, these honey lemon garlic pepper chicken thighs are mouthwateringly delicious.
I often make these when I have friends coming for dinner as they are a crowd favourite and I am yet to meet a person who didn’t like that flavour combination. Plus, they are super versatile when it comes to side dishes and can be served with everything from mashed potatoes and rice to zucchini noodles and coleslaw salad.
This chicken thigh recipe is gluten-free, dairy-free, paleo-friendly and overall pretty healthy.
What You’ll Need
Here is what you will need to make this chicken thighs recipe.
Chicken thighs – I like making this recipe with skinless, boneless chicken thighs but you can use meat with the skin on. Bone-in thighs should cook in the same amount of time.
For the honey lemon sauce – You will need a large lemon or two smaller ones, good quality honey, freshly ground pepper (for maximum flavour), fresh garlic and garlic powder and salt. Plus olive oil or another cooking fat for pan-frying chicken thighs at the start.
How To Make Honey Garlic Lemon Chicken
Step 1. Preheat the oven to 200 C / 395 F.
Step 2. Place the chicken thighs flat on a cutting board close together. Sprinkle with half of the salt, pepper and garlic powder. Turn the meat over and season the other side with the remaining salt, pepper and garlic powder.
Step 3. Pan-fry the chicken. You can do this in one or two batches. I like to use two frying pans to speed up the process. Heat 1-2 tablespoons olive oil in each pan over medium-high heat (7-8 on induction). Once hot, add the chicken thighs without overcrowding the pan too much. Cook for 4 minutes on each side, until golden brown crust forms.
Step 4. Prepare the honey lemon sauce. Grate the zest 1/2 of the lemon, about one tablespoon, and juice the whole lemon. Add both to a mixing bowl. Follow with diced garlic and honey and whisk using a fork until well combined and smooth. Set aside.
Step 5. Transfer pre-cooked chicken thighs to a large baking tray or dish. Pour the honey lemon garlic sauce evenly over the chicken.
Note: Leave one of the frying pans uncleaned as we will use it to finish our sauce.
Step 6. Place in the hot oven on the middle shelf. Set the timer for 7 minutes. Then, take the tray out and use a spoon to scoop and baste the meat with the sauce. Place back in the oven for another 7 minutes and repeat with the basting. Cook for the final 5 minutes, remove from the oven and transfer the chicken to a serving plate. A total of about 20 minutes.
Step 7. Pour the sauce from the baking dish into the used frying pan. Place on high heat and bring to a boil. Cook for 5 minutes, stirring frequently, or until the sauce reduces by half. The flavour will get more intense, sweeter and saltier as the liquid thickens and becomes more glossy. I like to stir in a teaspoon of butter to give it extra shine.
Finally, pour the reduced sauce over the chicken and serve. You can reserve some of the sauce to pour over the sliced chicken when once plated.
What To Serve With Glazed Chicken Thighs
These honey lemon garlic pepper chicken thighs pair nicely with many sides:
White or brown rice – I like making yellow rice with a little turmeric; coconut rice also works really well with these flavours. Rice is great for soaking up all those sweet and tangy juices.
Potatoes – I’ve done these with both mashed potatoes and roast potatoes with equal success. Highly recommend!
Quinoa or couscous – these are my other favourite sides with this chicken dish.
Vegetable options – for a lighter side, try these with cauliflower rice, broccoli rice, zucchini noodles or steamed green beans, asparagus or broccoli. They will even go well with a simple salad or coleslaw, which I often make as a second side dish anyway.
More Chicken Thigh Recipes
Full Recipe
Find the full list of ingredients, instructions and extra cooking notes below. If you have questions or cook this recipe, please let me know in the comments and make sure to rate this recipe so it’s easy for others to find.
Description
Pan-fried for that golden skin, then baked and finished with the magical sweet, tangy and citrusy sauce, these honey lemon garlic pepper chicken thighs are mouthwateringly delicious.
- Heat oven. Preheat the oven to 200 C / 395 F.
- Season chicken. Place the chicken thighs flat on a cutting board close together. Sprinkle with half of the salt, pepper and garlic powder. Turn the meat over and season the other side with the remaining salt, pepper and garlic powder.
- Pan-fry the chicken. You can do this in one or two batches. I like to use two frying pans to speed up the process. Heat 1-2 tablespoons olive oil in each pan over medium-high heat (7-8 on induction). Once hot, add the chicken thighs without overcrowding the pan too much. Cook for 4 minutes on each side, until golden brown crust forms.
- Prepare the honey lemon sauce. Grate the zest 1/2 of the lemon, about one tablespoon, and juice the whole lemon. Add both to a mixing bowl. Follow with diced garlic and honey and whisk using a fork until well combined and smooth. Set aside.
- Bake the chicken. Transfer pre-cooked chicken thighs to a large baking tray or dish. Pour the honey lemon garlic sauce evenly over the chicken.
- Note: Leave one of the frying pans uncleaned as we will use it to finish our sauce.
- Place in the hot oven on the middle shelf. Set the timer for 7 minutes. Then, take the tray out and use a spoon to scoop and baste the meat with the sauce. Place back in the oven for another 7 minutes and repeat with the basting. Cook for the final 5 minutes, remove from the oven and transfer the chicken to a serving plate. Total of 20 minutes.
- Reduce sauce. Pour the sauce from the baking dish into the used frying pan. Place on high heat and bring to a boil. Cook for 5-6 minutes, stirring frequently, or until the sauce reduces by half. The flavour will get more intense, sweeter and saltier as the liquid thickens and becomes more glossy. I like to stir in a teaspoon of butter to give it extra shine.
- Serve. Finally, pour the reduced sauce over the chicken and serve. You can reserve some of the sauce to pour over the sliced chicken when once served on individual plates.
Nutrition
- Serving Size: 1-2 chicken thighs
- Calories: 393
- Sugar: 12 g
- Sodium: 819 mg
- Fat: 15 g
- Carbohydrates: 14.2 g
- Fiber: 0.3 g
- Protein: 49.2 g
- Cholesterol: 233.4 mg
Keywords: Chicken Thighs, Chicken Recipes, Honey, Lemon, Garlic, Pepper, Dinner Recipes
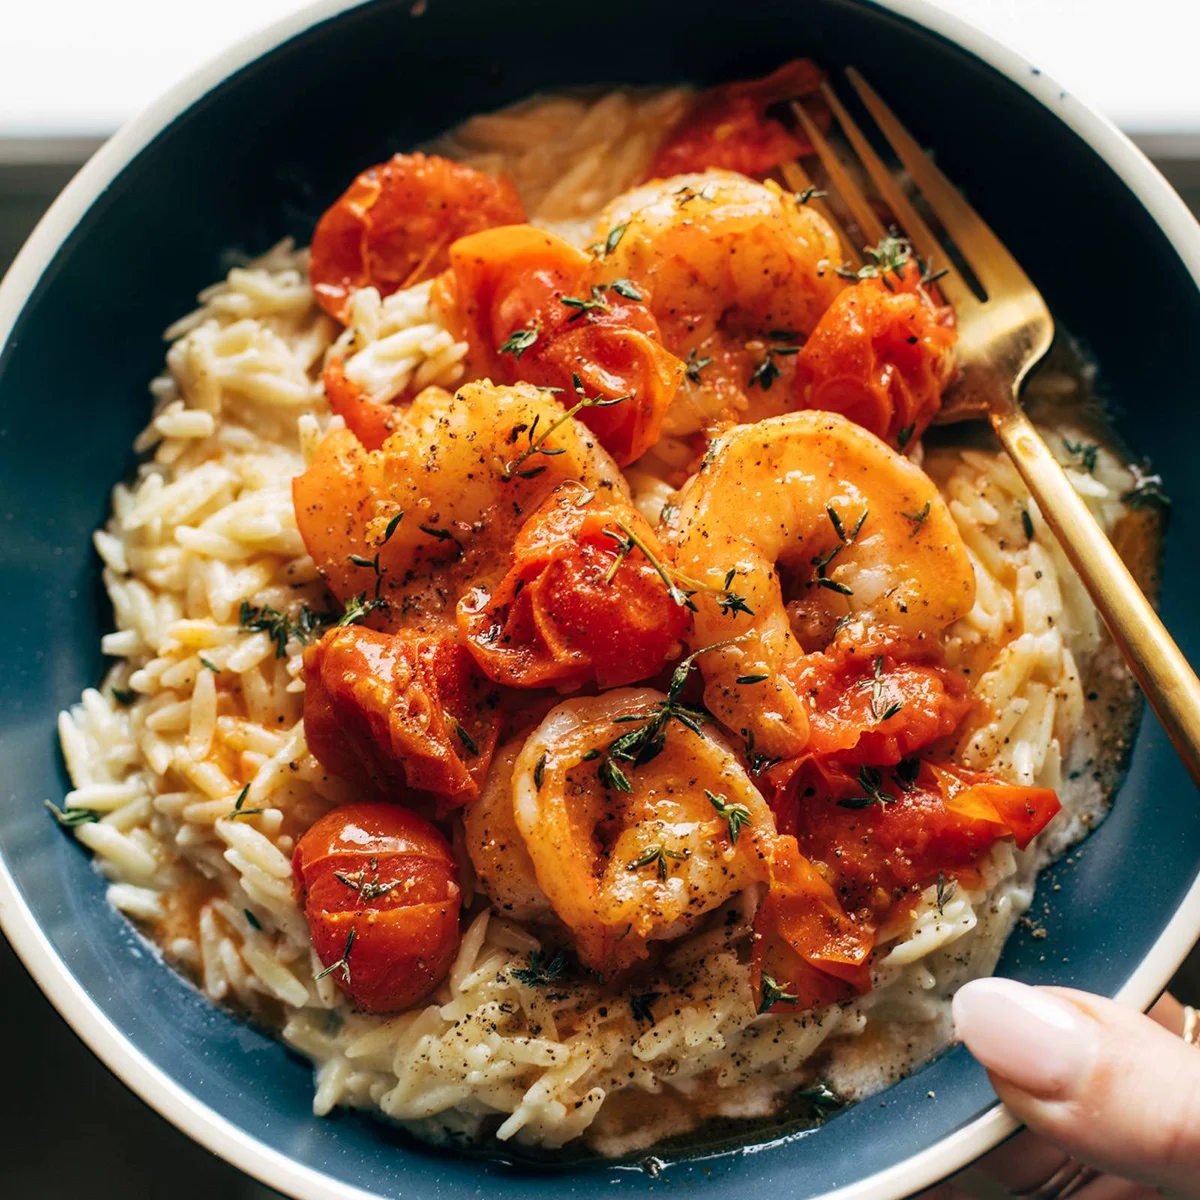
Garlic Shrimp and Tomatoes with Parmesan Orzo Recipe
Shrimp laced with buttery garlic and thyme and a burst tomato sauce served on a creamy Parmesan orzo.
Juicy, succulent shrimp laced with garlic, butter, and thyme, tucked into a silky burst tomato sauce, and piled high on creamy, luscious Parmesan orzo. WHAT A DREAMBOAT DINNER. I love this recipe!
In This Post:
How To Make This Garlic Shrimp and Tomatoes (with Pictures)
Step 1: Blister and Smash the Tomatoes
Get the tomatoes hot and blistery; then give ’em a gentle smash with the back of a spoon or a small plate. It’s… very fun.
Step 2: Cook the Shrimp
Make a little clearing right in the center of the tomatoes where you can add your shrimp to cook for a couple of minutes. Salt it up!
Step 3: Get the Garlic and Butter Going In There
Throw in a bunch of freshly sliced garlic and a knob of butter. Stir it up a few times until it’s dreamy.
Step 4: Make a Creamy Orzo
Put a lid on the shrimp and make a quick creamy orzo – butter, Parmesan, cream, lemon, and salt.
Step 5: Put It All Together
Piping hot orzo goes on the plate first, and then we pull our shrimp and tomatoes back out to pile on top.
Lindsay’s Notes
This recipe is in heavy rotation at the moment – and it never fails to make me feel like I’m eating at a fancy restaurant and/or generally have my life together. Is my laundry all over my table? Yes. Have I been using dry shampoo for the last 4 days? Yes. But am I also eating a kind of fancy and beautiful dinner? YES! Three cheers for doable “fancy” recipes. 10/10 recommend.
Creamy orzo with the twang of Parmesan, sweet burst tomatoes gently bubbled into a sauce, and a pile of jumbo, delicate, buttery, garlic-laced shrimp. Pass me a glass of wine and I am living my best life.
As far as family approval goes, Bjork and I love the whole big, beautiful thing – no thyme for him (a true crime and I don’t want to spend any more time talking about it), and lots of thyme, salt, and pepp for me. The girls are hit and miss with the shrimp and tomatoes, but you better believe they love the creamy Parmesan orzo which is, of course, just mac and cheese in disguise. They’ll usually eat a few of the fresh little tomatoes on the side, too. Winning for everybody!
Description
Shrimp laced with buttery garlic and thyme and a burst tomato sauce served on a creamy Parmesan orzo.
Garlic Shrimp and Tomatoes:
Creamy Orzo:

- Cook the Orzo: Cook according to package directions. Drain, toss with a bit of oil, and set aside.
- Soften the Tomatoes: Add the tomatoes and olive oil to a pan over medium high heat so they can soften and get a bit blistered on the outside. I usually cover the pan to avoid extra splatters.
- Smash the Tomatoes: Once they’re soft (5 minutes or so), give them a gentle smash with the back of a spoon or applying even pressure with a plate or similar flat object. You want the tomatoes to be partially burst / smashed so they release some juices.
- Cook the Shrimp: Make a little clearing in the center of the tomatoes and add your shrimp right in; season them with 1/2 teaspoon salt and cook for 2 minutes on each side.
- Give it Some Flava-Flave: Add the garlic, butter, and 1/2 teaspoon salt to the pan and stir to mix it all together. Let it get saucy and bubbly; then remove from heat and cover with a lid.
- Make the orzo: Mix the orzo with butter, half and half, Parmesan, and lemon. Stir to combine; warm it up over the heat if necessary.
- Pile it up: Serve immediately so the orzo doesn’t get too starchy and sticky! Pile it on a plate with a big scoop of steamy shrimp and tomatoes. Top with thyme. So good!
Notes
This amount usually makes enough for just Bjork and I to finish the shrimp, with plenty of orzo for us and the girls. If you wanted to serve 4 adults, I would use 2 pounds of shrimp!
- Prep Time: 10 minutes
- Cook Time: 40 minutes
- Category: Dinner
- Method: Saute
- Cuisine: American
Keywords: shrimp and orzo, orzo recipe, shrimp and tomatoes
Recipe Card powered byFrequently Asked Questions For Garlic Shrimp and Tomatoes
What can I use instead of shrimp?Chicken would be delicious! I would probably pan-fry the chicken first, then take it out and set aside while you build your tomato sauce, then add the chicken back in at the end.
How long do the leftovers last?You can definitely eat this meal as leftovers for 1, maybe 2 days after you make it, but it’s one of those meals that really shines when it’s made fresh.
Can you make this vegetarian / meatless?Use zucchini in place of the shrimp! Or, similarly, this recipe is great.
How do you make this gluten-free and/or dairy-free?Use gluten free orzo, dairy-free butter (or olive oil), and something else creamy in place of the half and half and Parmesan – a knob of dairy-free cream cheese would be good!
Another option would be to skip the creamy orzo and serve this with quinoa or another gluten-free, dairy-free option.
My Favorite Shrimp Recipes
Join the Conversation (0)
Nutrition Facts
Amount per serving
- Calories N/A
- Total Fat N/A
- Saturated Fat N/A
- Cholesterol N/A
- Sodium N/A
- Total Carbohydrates N/A
- Protein N/A
Hi, I'm Alex!
I love sharing easy, healthy, and family-friendly recipes that anyone can make at home.

Be the first to comment on this recipe!